Friday, 26 July 2019

Digital Fluency Intensive #6

Manaiakalani: Connected
The default is visibility. Manaiakalani connects students across the cluster for valuable sharing and connecting for learning. We are also connected to a number of clusters around the country as part of the Manaiakalani Outreach. This allows for teacher support and a shared language as well.

Connected learners share (Tohatoha). What a great reminder that we are all connected through the Manaiakalani site to our own school sites, which enables students (and teachers) to see what is happening at other schools. 

Implementing the kaupapa of Manaiakalani all four elements are required to be working together at all times in order for the effectiveness to be seen across the classrooms. 


Looking at the visual appeal for sites and 2-3 clicks. What is good and what needs improving? We spent time looking at sites from around the clusters and evaluating them. 


By using Google Sites (instead of other available platforms) students have access to their learning and resources at any time, whether at home or school.  When creating a site, you always need to consider who your learners are, how they are accessing the site, what the theme of your site is going to be and what the purpose of the site is.
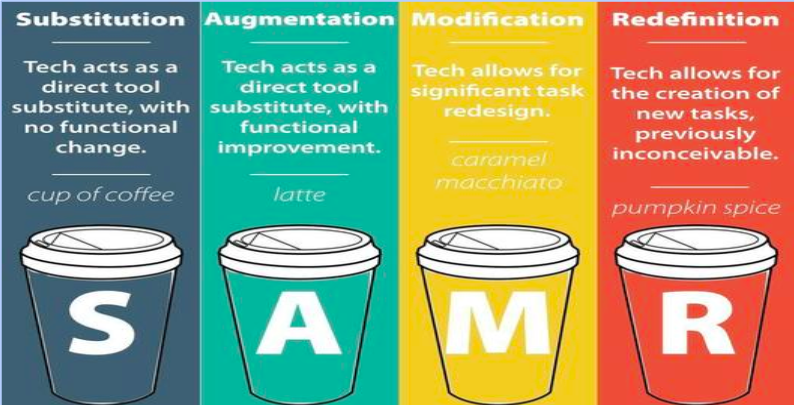

No matter what you are creating for students, it is important to make them purposeful learning tasks. don’t forget to keep the SAMR model in mind.  When modifying and redefining, it is important to remember that you are using multiple platforms to learn, create and share their learning. Just as it is important to spend time reflecting on the technology affordances you are providing for your learners.


One of the things that I spent some time doing today was cleaning up our team site a bit. We tend to randomly add links to our site as we need them (for testing purposes, media links, etc). I went through and made these links more uniform to the rest of the site format by creating actual buttons. Some of these can be seen on the bottom of the home page for our class site.

Taking time in the future to have students create a site for a specific reason is something that I am considering and the reminders we were given today about the site building are a great place to start when working with students as well. A big thanks to Clarelle Carruthers for all her helpful tips, especially those in regards to choosing a colour scheme, font(s), and layout to use throughout the site development.


COL PD: Monitoring and Identifying Change to Practice

During our COL Meeting, we spent some time with Aaron and Hanna discussing where we are at this time in our Inquiry process. Below are the points to ponder from that discussion.

Aaron and Hanna (WFRC)
Monitoring and Identifying Changes to Practice

Restate your Theory of Action:
The valued learning outcomes I want to improve for my students in this inquiry are….
The changes I am making to my teaching to improve their outcomes are…
The reasons why I think these changes in my teaching will be effective to my learners are…

Implementation
By the end of you inquiry, you want to know what the changes are that have happened for the learners and what has been the reason for it? What has the teacher done that caused those changes?
-Pre/Post for student understanding ...also pre/post updates on what is being changed in the classroom by the teacher
-Implementation fidelity-How faithful are you as the teacher in making sure that the actual intervention is the planned intervention (how can I be sure that opportunities in the classroom are authentically occurring)

Monitoring
-As well as informal monitoring (lesson-by-lesson and minute-by-minute planning), it is useful for more formal checkpoints
-Reflection and Inquiry have two different purposes...Inquiry has evidence to back it up. Reflections are more about how did it go.
-More micro-formative assessments (ie mini-easstles for reading tests)
-Student voice is vital. Quick fire exit questions, or chats with some case study students.

Tuesday, 23 July 2019

6 Month Academic Results

Using either the Blue PM+ kit (up to Level 22) or the Probe test. I was very impressed with the results of the majority of the students in my classIt was great to see that three students in my focus group had accelerated growth, two had expected growth and I was able to pinpoint some learning points to focus on specifically with the two students who did not make any progress.


**Note: The results on this graph are from Running Records (Blue PM+ and PROBE)

Our class also grew by new two students working at this level during Term 2 and those two students were not tested again since they had just arrived at PES a few weeks prior.During the Term 2, we spent some time conducting Running Record tests for our Reading students using either the Blue PM+ kit (up to Level 22) or the Probe test. I was very impressed with the results of the majority of the students in my class.

It was great to see that in less than 6 months time, Students B (1.5 years), E,(1 year) and G (1.5 years) in my focus group had accelerated growth, Students A and C expected growth (6 months) and I was able to pinpoint some learning points to focus on specifically with Students D and F who did not make any progress. In order to move forward, I am going to work specifically with these two students to improve their ability to emphasise with others, especially with characters from their texts.  It is my hope, that by providing many opportunities to discuss a character's feelings and infer why they are feeling a certain way will enable all the students, but primarily Students D and F to make that expected growth next term.

Our class also grew by new two students working at this level during Term 2 and those two students were not tested again since they had just arrived at PES a few weeks prior.

It is my intention to work with the 4 students who have yet to make progress and test them again before the end of Term 3.  Hopefully, this testing will allow me to focus their learning more specifically to their individual needs.

Wednesday, 3 July 2019

Digging Deeper

In an effort to dig deeper in to vocabulary acquisition, I have been taking some time to change the way that I have always viewed providing students with the definition of a new word. In the past, I simply told the students the definition or told them to look it up. Now, in the beginning of the teaching career it sounded more like, "Grab a dictionary and see what you can find out" and since teaching in a digital environment it became, "Use a define: smart search."  This is not to say that in the moment of working with a group of students (especially those reading at the lower levels of the colour wheel),  I did not focus in on using context clues to determine the meaning from within the text. However, after meeting with Dr. Jannie van Hees at a recent Professional Development session with my team, I began to think of ways to provide more student voice as we dug into deeper understanding of vocabulary found within our texts.

After providing my students some time to independently read through the text, in our small group session, I led them to specific sections of the text that I had previously determined. While those shorter sections orally, I stopped and pulled out specific words and phrases that I felt we needed to dive deeper with. I simply began with a "Hmmmm, I wonder what that means...magnificent height and breadth?"  I then, grabbed a sheet of paper and put that phrase into a bubble in the middle of the page, and asked the students what they thought. After adding all of our ideas to the word chart, we read the selection again and students were asked to formulate their own definition using our word chart.

Here is one student's response:

Sunday, 30 June 2019

Creating with Slides

This term, I really wanted to find ways to engage my Year 7/8 students more when completing Learn and Create tasks. Now that I have a group of students working at a Year 8 reading level and it was my intention to provide them with some choice when selecting their supplementary texts. We spent some time reading and discussing the School Journal story "The Seeing Hawk." Students were then given opportunities to select a topic to independently dive deeper into (as seen on our site here).

After selecting one of two learning paths, students were asked to use the information to create a fun and interesting Digital Learning Object (DLO) of their own choice. As part of our DFI sessions, we spent some time looking at Google Slides and one week I had a go at creating an interactive game (Seen Here).  So, of course, before setting them off on their way, I quickly showed off my skills making a game using Google Slides.

A few of the boys in class decided to work together and they have been problem solving their way through to create this game about the Tā Moko.  When you play the game (in present mode), the various boxes are clickable and students can select the answer they agree with before the slides flips and they find out how they did.


I was very impressed that the boys took time to try something new and they have embraced the intricacies that come along with formulating a slide show game. I also really like that they are teaching after the answer in selected to provide more information about that question topic. 

This is an awesome Create (or Create to Learn) task that extends the computer skills and computational thinking of our older students. I am excited to implement more tasks similar to this in the upcoming weeks that will allow my students to feel like they are doing something new and exciting. 

Friday, 28 June 2019

Digital Fluency Intensive #5

What did I learn that increased my understanding of Manaiakalani kaupapa and pedagogy?

Manaiakalani: Visible Teaching and Learning

It is easy for us to overthink the word “visible”. However, it has been around since the beginning of time. 

Previously, the teaching/learning journey was invisible. It was very difficult to see what it was that students were learning at a particular time. Many students learnt how to read the teacher’s mind and figure out what was expected of them. This often comes from family involvement and discussions that occur in the household.

However, it is now the way in Manaiakalani classroom for teaching and learning to be visible to enable all students to be successful. In all aspects of classroom interaction (from planning, process, outcomes and assessment) what can be visible?  We want to be sure that there are no surprises in our classroom for our students. Teaching should be accessible, available and advanced.

Using Multi Modal Learning
As educators, our job is to make learning engaging, and exciting for our students. We, in Manaiakalani, need to always remember our Hook. Is what we are doing in class engaging? Will it “hook” them into the learning that I want them to experience? We need to be working to inspire our kids to go in and investigate further. 

What did I learn that could improve my confidence, capability or workflow as a professional?
 
General Rules of Thumb: (and great reminders!)
Always, plan your site first on paper. Make sure you set up a folder in your drive with the permission settings set to anyone with the link can view. 

Students should be able to access what they need within THREE clicks. 

Headers: Use a Banner (w/ Image) or Title Only.

When creating buttons using Google Drawing, it will always open a new tab which does not allow students to "go back". 

Embedding Twitter Feeds: Go to publish.twitter.com put in the twitter feed account URL that you want to use and then select that you would like it as a timeline. Once you get the embed code, add it to your site and it will naturally populate in real time. 


What did I learn that could be used with my learners?  
As part of our afternoon, I spent time working with Robyn Anderson and Sarah Tuia to create a mutli-modal Google Site using the mulit-textual database that I helped to create as part of my 2017 Spark Manaiakalani Innovative Teacher inquiry. We spent time looking at Maori myths/legends and working our students through the historical art of oral story telling. A link to our site can be found here. I would love to use this site with my students in the future and consider putting together multi-modal site pages together for students to use in the future, especially for topics covered every year (ie Matariki, Pt England Way, etc).


Friday, 21 June 2019

Digital Fluency Intensive #4

What did I learn that increased my understanding of Manaiakalani kaupapa and pedagogy?

Share:
We have been sharing as humans since time began. While the mode of sharing is ever changing, the actual human response remains the same. However, digital affordances have changed the speed and amplification of the information being shared. Since 2005, the original 7 Manaiakalani schools have focused on harnessing the digital affordances to find the best way to use the latest technologies to help our students learn most effectively.

Why do we (still) use Blogger: Used as a space where we can teach our students many things at one time when focusing on what it looks like to be an effective digital citizen while online. As a school, we have many systems in place that allow us to legally monitor student (and general population) engagement with the digital tool. The importance of blogging three times a week was also revisited as it has proven once again (by the Woolf Fisher Research Centre) that students who blog three times a week continue to show academic growth even during non-teacher contact time.

Manaiakalani is the only cluster of schools in NZ that has a dedicated Cybersmart Curriculum. We know that our students are taught a dedicated Cybersmart Curriculum.  

What did I learn that could improve my confidence, capability or workflow as a professional?


Google Forms:

We had a few good reminders before sending out a form. Using the settings, make sure you check:

-Do you want email addresses?
-Responses to form emailed to participants
-Checking/Unchecking external domain access
-Limit to 1 response (or not)
-Editing after submission
-See other’s responses

Perhaps the most mind blowing suggestion for me is using one spreadsheet to collate data for many forms. I hadn't realised that you could do this previously. It would be so beneficial to have all the data collected using forms for one school year on the same spreadsheet.
-Select Response Destination
-Select Existing Spreadsheet
-Rename the tabs to reflect the correct form

Sheets:
Sparkline: Making individual line graphs for a row of data that shows in a cell. (=Sparkline).

We also learnt how to program a Macro to record a set of directions that are used often. Those directions are programmed into a recorded list and then can be applied with the stroke of a few keys to update a new spreadsheet (or tab) in the same way.


What did I learn that could be used with my learners?  

My Maps:
Used to track/plan journeys, measure distances, add place markers
Importing from a Spreadsheet:
-You are able to have students add data into a Google form and then import that information from the spreadsheet onto the MyMap place markers. 
-Creating various layers using the same map
-Students can embed their individual MyMap to their blog


I would love to have my students trial the Blog Post Analysis as I discussed on my post here.